This is a copy from previous post on "wordpress" post on Tuesday, Februdary, 4, 2014. I wish to modify and repost this post on Blogger and believe this to be the last (copy) of all my previous post on wordpress. Thank you again for your indulgence and support in reading. Garylee
FLYWHEEL FOR THE NEW 8V71, JAN. 25, 2014
Hey everyone, Well I am trying to get back working on my bus conversion project, I have spent a lot of time on personal comments on this blogging project of mine and just wanted to let you know that I am like everyone else with same problems as everyone, short on money, hate the dam political controls on us now and so on and so on.
Anyhow, have a little patience with me again here, I want to learn how to categorize my bus information on "Wordpress" and this seems like greek stuff now until I complete my first post. I will pick up on what I am working on now and take my time and back track and by categorizing and dating things you will be able to see things in sequence I want to present them for you. There has been one person who expressed interest if he could do what I am doing as he wants to and I want to assure him that he can. NOTE: since this post was originally written I have since modified and converted it to Blogger as I believe the softwear on blogger will be easier for me to use and do more for me at the same price, FREE!!
I will do all I can to simplify everything as much as I can. Much of this stuff I will be blogging about will be too simple for many of your old timers so you might as well just as well take me off your favorites list unless you want to laugh at me while you drink your morning coffee. I will probably be wasting your time and you will probably say to yourself, what does he think, we are all stupid or just out of 3rd grade?? This is not my intention, I just want to help those that have not ever done anything like I have done and are thinking of trying to do it.
I am sure even you old timers had to learn to get the knowledge you now have, it is too bad that a lot of you do now wish to share that knowledge to those that really would use if they just didn’t have to always pay for it all the time. Anyhow!! Well Today I dived into the Christmas Presents that My buddy Steve Gains aka (Kentucky Steve) brought me I think on Thursday evening. Thursday or Friday, grief, I don’t know what to hell today is really. Anyhow I couldn’t wait to get started, cold or not and man it has been freaking cold here in SC for days and days. I can’t remember it being this cold in 27 years really. I wonder if Obama had anything to do what that??lol
Well I could not work out in the open so I brought the flywheel Steve brought me and I desperately need to complete my new 8V71 assembly into one of my 5 sheds I have here, I am a male hoarder, not whore!!. This shed is insulated and I have one of those kerosene heaters in it and had it toasty warm in 7 minutes and I was whistling a Yankee song after I got warm again and started to clean up one of my new christmas toys. In this bus conversion blog am including photos of just my clean up of the flywheel and the importance of re- tapping of all the holes in the flywheel now while you can. While the flywheel is on a workbench and you are comfortable working on the flywheel before I have the clutch surface of the flywheel ground for re-assembly.
I have also given submitted photo of tools needed for newbies that would make the job easier that I use to clean up the engine parts, but I forgot to mention SAFETY GLASSES and Hard Toed Safety Shoes as well. This Baby (flywheel & starter gear) is heavy, if dropped it can cut off a foot, or toe in a second or make your toes thinner than two ply toilet paper!! Without me having to mention it all the time, (ALWAYS)assume you are to wear safety glasses and safety shoes when working on your bus conversion. You will thank me one day, I assure you. Ok, enough for that and I will not mention that too many more times, I know you hope not.
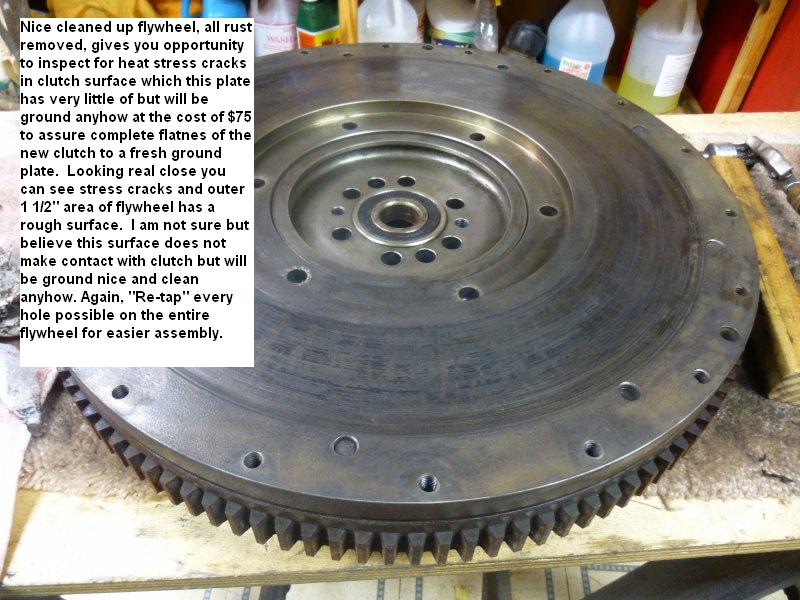
I wanted to clean up the flywheel of surface rust and debris in the holes and remove the surface rust as if it were not going to be ground and was just going to be reassembled. This gives you an opportunity to further inspect for damaged threaded holes, deeper cracks like in my old flywheel which I will include a photo of here in this blog also for example to see. But also so you can be sure that there is no burrs of any kind on any surface of the starter gear surface that will sit on the grinding table that will decide the flatness of your flywheel plate while being ground. One little burr can make your real flywheel plate ground at an angle and cause contact of your clutch against this plate to be on one side of the plate when activated when you hit the clutch.
Taking your time on anything to especially being done to your engine is money in the bank to prevent premature breakdowns because of assembly mistakes or not taking the time to prevent possible catastrophic engine failures that could cost big, big money on the road. But this also give you an opportunity to inspect every aspect of your engine for incorrect bolts used or overtightened bolts, broken lock washers, missing lock washers, rounded off bolts from overtightening. There is so many things that a close inspection can discover that a rebuild shop cannot as they cannot take the time to look at absolutely everything you will be able to do, this takes too much time and you will not be able to afford the rebuild shop the extra inspection time and question their process anyhow especially if they found nothing. I will tell you what I just accidentally just found a few days ago.
I had intentions to remove and replace all the brass fittings and draining valves of the engine block. well I took off the two pet cock drains right under the exhaust manifolds. They were plugged to the max with debris, grease, dirt and I have no idea what else, photos also will be in this blog as I am now talking about it so might as well show it to you to inspect when you do. A rebuild shop probably will not do this as I had a hard time removing these pet cocks, they were there a long, long time. I now have to flush out my engine as I have no idea how bad this debris clogging is any place in this cavity.
This could have made my engine run hot, plugged my heater core and heater hose in time, who knows just what else could have happened!! Another lucky find from inspecting and taking my time!! Something else for you to remember to look for. Remember, (REPAIR SHOPS ALWAYS ASSUME, A BUS OWNER HAS DEEP POCKETS, YOU ARE ALWAYS IN A HURRY TO GET ON THE ROAD AND YOU WILL NEVER SEE THEM AGAIN, THEY CAN STICK IT TOO YOU WITH A SMILE AND THEY DO). Now this is just a warning of some, not all shops, but on the road you do not always have the option to shop around at $200-500 towing charges if you pay out of your pocket. TAKE YOUR TIME, I WILL HELP YOU AS MUCH AS I CAN OR SOMEONE ON ONE OF THE BUSNUT BOARDS CAN so that things like above do not happen to you on the road. Minimizing the chances of your engine overheating is money in the bank, I am sure these simple things are overlooked many times if not nearly all the time as being trivial. They think your radiator is undersized, you are overweight on your bus, you are lugging your engine, so many things and it could be something as simple as a plugged water cavity going through your engine!! Now I will start to add some of the photos I talk about above, and hope this blog does not lose your interest but make you think how simple things of prevention can possibly prevent future breakdowns thousands of miles from home. This is one of the two drain pet cocks located under each side of the engine right under the exhaust manifold. 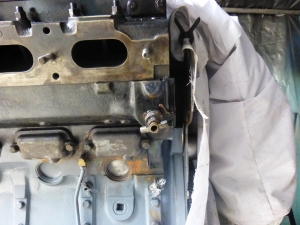
Close up view after the removal of one of the drain pet cocks shows that the water jacket is completely clogged with debris making the possibility of ever draining this engine if needed impossible. Also it looks like this water jacket could be contaminated through out and needs to be flushed. This water jacket being being clogged also would cause the engine to run hot and clog the entire heating system I intend to use. This was a good find, I am sure never would never be looked at when a DD shop rebuild is done. It would be to time consuming and costly to do unless requested by the owner of engine. 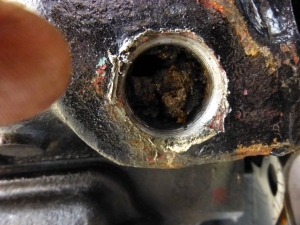 After digging out what could be dug out of the water jacket this is what is left needing to be flushed out of the water jacket. This debris has to be old coolant, dirty oil mixed in it, grease and dirt who knows where it came from and just plain filth that could have come from the work done from the previous engine rebuild? Not sure where it all come from but flushing of the engine just has to do much to make the engine run cooler now.
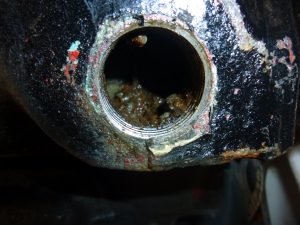
After digging out what could be dug out of the water jacket this is what is left needing to be flushed out of the water jacket. This debris has to be old coolant, dirty oil mixed in it, grease and dirt who knows where it came from and just plain filth that could have come from the work done from the previous engine rebuild? Not sure where it all come from but flushing of the engine just has to do much to make the engine run cooler now.
The is the inside of the real pet cock, completely clogged, impossible to be used to drain anything. This draining pet cock was cleaned out entirely and then found to be seized up and needing replacing and was. This was the case on both sides of this engine. 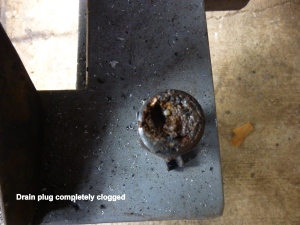
This is a photo of the Original flywheel from my old 8V71 engine, deeply cracked from heat, The cracks extend into bore of flywheel up to the bolts holding it into engine. This flywheel is absolutely no good. Someone really rode the clutch on this engine for some great length of time to heat this plate up to this extent. 
One of the many deep cracks as well as the thousands of smaller deep stress cracks in this worthless flywheel. Value of replacement flywheel when new, $500 -$2000 from DD dealers depending upon the model of bus and SN of bus to decide the FLYWHEEL only cost. 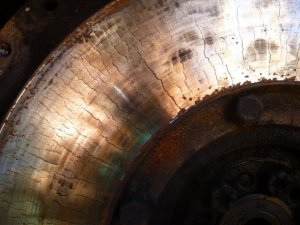

Here is close up of one of the many deep cracks extending right up into the bolt holes of the flywheel, this baby had to had gotten really red-hot to do this damage. No way this flywheel can be salvaged.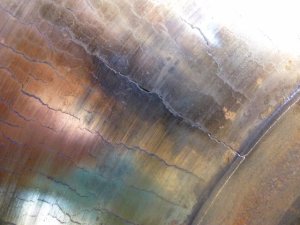

Another close up of the extent of the depth of the heat stress crack induced into this flywheel by the previous operator making this part of the engine absolutely no good. 

Photo of tools normally used to clean up of engine parts, clicking on the photos will enlarge them so reading the descriptions is possible, I took this photo after I had already started to initially started to clean this wonderful gift from Kentucky Steve, my new flywheel. Now I had to continue to clean, retap and remove any burrs off this flywheel before bringing to a shop to have ground nice and flat. There is slight stress cracks but it will only take a few thousandths off to clean up to smooth metal. The cost of grinding flywheel is $75.00, the savings of this flywheel from Steve is from $500 – $2,000????!!!! Crying out loud!! From a DD dealer by the way. I love you Steve!!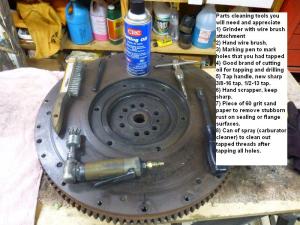

Already started to clean up of flywheel. 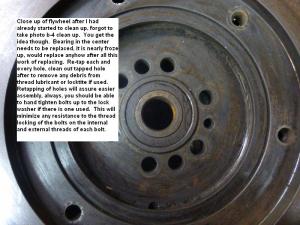

Clutch wheel surface of flywheel to be ground flat is all cleaned up and ready to be ground nice and flat. 
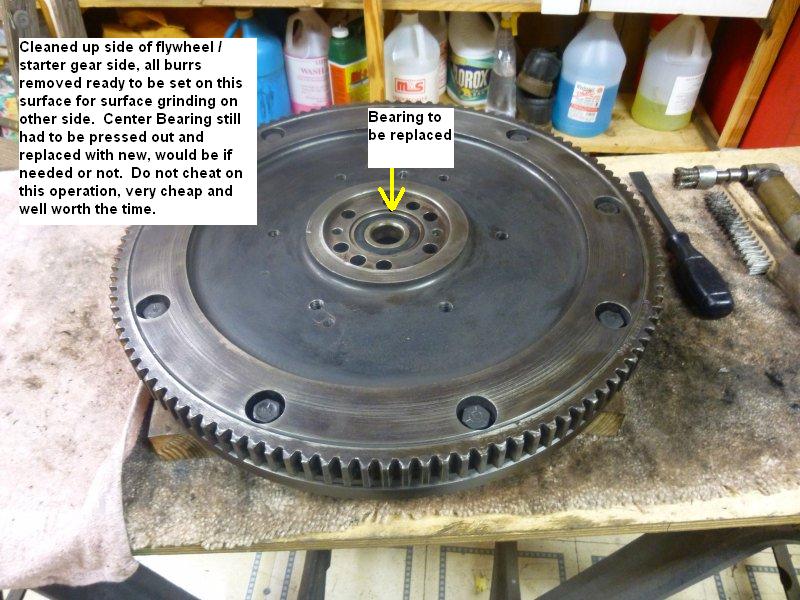
Other side of flywheel, Starter / gear end assembly is ready for clean up, this has to be as clean as possible, all burrs removed to prevent tipping on grinding table so Flywheel will be flat when assembled and clutch will hit on all surfaces 360 deg. when the clutch is applied. 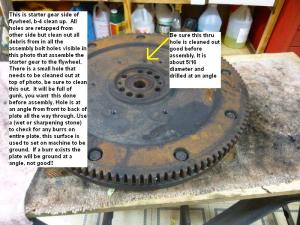
Gear end of flywheel all cleaned up and deburred ready for grinding. a big improvement from above photo. 
Well this is the end of todays accomplishment, probably not exciting to you but it was to me, look at the money Kentucky Steve saved me on this. Rebuilding a bus engine is just nothing you want to take for granted that will be a piece of cake, unless of course you have very, very deep pockets. In that case you don’t need to read all this stuff, you will be paying some smuck to do it for you, like me!!
Good Night, now I hope to put it in my categories section, good luck to me too.
Garylee
No comments:
Post a Comment